As a Windows user, you should be familiar with the overall user interface concepts and know how to work with menus, dialog boxes and the mouse. Chartist complies with the user interface concepts of Windows.
To use Chartist effectively you need the following capabilities in your computer system:
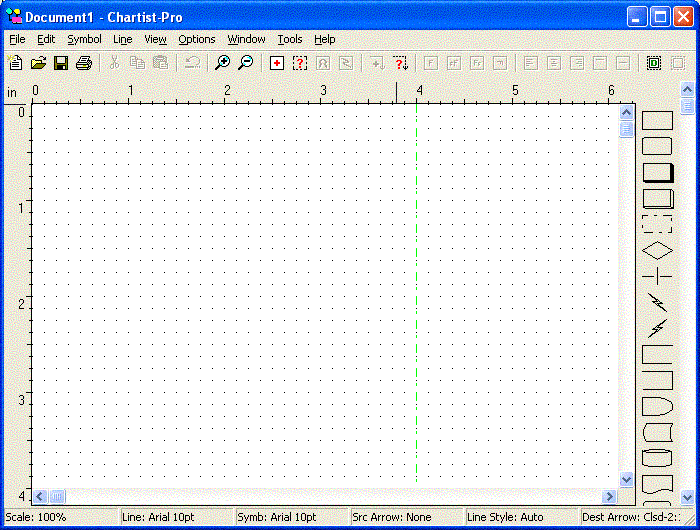
Figure 3-1
The Chartist Main Window
The Chartist Title Bar is located at the top of the main window. It contains the name of the application and the file name of the current document.
Also in the Title Bar are the System Menu button at the left, and the Minimize and Maximize buttons at the right. These buttons operate in the standard manner.
The menu bar contains all of the commands for using Chartist. This menu bar operates in the standard manner, with the mouse or with the keyboard by pressing the menu key (F10).
After you pull down a menu you can highlight a command with the arrow keys and press F1 to get help on that menu item. This will activate the Windows Help System and display information on the menu item.
Hint: If you want to refer to Help often as you become familiar with Chartist, leave the Help Window open. This will greatly improve the speed of referring to Help from Chartist.
Each of the menu commands is described in Chapter 9: Commands Summary.
The Tool Bar is located beneath the Menu Bar. It contains short-cut buttons to activate frequently used commands. The Tool Bar buttons are described along with the Menu commands in Chapter 9: Commands Summary.
The Tool Bar is visible when the View Tool Bar command is checked.
The ruler runs along the top and left edges of the chart document. The measurements begin at the top left corner of the chart. Dimensions are in inches or centimeters, depending upon the Options Chart... settings.
The ruler is visible when the View Ruler command is checked.
The Shape Palette is visible along the right hand side of the Chartist Window when the View Shape Palette command is checked. This palette contains the shapes from the current shape library, and provides a quick way to add symbols of different shapes. See Adding Symbols in Chapter 4.
The document is shown in the client area of the main window. A Chartist document covers one or more sheets of printer paper. The boundaries of each sheet covered by the document are drawn with a solid green line. The center lines of each sheet are drawn with dot-dash lines.
Grid points are shown as black dots in the main window. Grid points do not show in the Clipboard, nor when the document is printed. The spacing between grid points may be set from the Options Chart... command.
When the Options Snap to Grid command is checked, all points selected by the user are snapped to the nearest whole grid interval.
Grid points are drawn when the View Grid command is checked unless the current display scale is too small to make them distinguishable.
The size of the display is normally shown "full scale." Because the actual screen size of some displays may be different from the nominal size known to Windows, full scale may be slightly different from a true 1/1 scaling. Printers generally are accurate in scaling.
The client area may be zoomed with the View Zoom Out Zoom In, Normal commands, changing the scale so that more or less of the document may be seen at a time. Zooming takes place in discrete steps, each step out representing about a 3/4 reduction in scale. Zooming has no effect on the printed size of the document or on the size of areas placed into the Clipboard. Refer to the Commands chapter for more information on Zooming.
Along the right side of the main window is a vertical scroll bar, and along the bottom of the main window is the horizontal scroll bar. These may be operated with the mouse, to change what part of the document you can see.
Clicking the down button on the vertical scroll bar scrolls the document up (and the viewing area down) by a small amount. Similarly, clicking the up button scrolls the document down. The scroll buttons on the horizontal scroll bar work the same way.
On each scroll bar, the rectangular unlabeled button in between the scroll buttons is called the "thumb." It serves two purposes. It indicates a how far the document is scrolled, and it allows you to "drag" the position of the document directly.
To operate the thumb, click on it and hold down the left mouse button, then drag the thumb in the desired scrolling direction. When you release the button, the document will be redrawn in the new position. The document does not change until you release the thumb.
The area of each scroll bar between the thumb and the scroll buttons is sensitive to the mouse as well. Clicking on the bar between the thumb and a scroll button moves the document by 1/2 the window.
Chartist uses the mouse to position the cursor, and to manipulate the document. Only the left button of the mouse is used.
The arrow keys on the keyboard may be used to position the cursor. When an arrow key is pressed, the cursor moves in the indicated direction by 1 display unit (pixel). If an arrow key is held down, the cursor continues to move at an increasing rate until the key is released. Arrow keys will not move the cursor outside of the main window client area.
Even with a mouse installed, arrow keys are useful for when you need very precise movements of the cursor.
The Enter or Return key operates like the mouse left button in the main window. Pressing the Enter key simulates a click and release of the mouse left button. Clicking and holding the mouse button is not simulated.
These keys allow you to move around the chart document in the main window. See the table below.
| Key Sequence | Movement |
| Page Down | Down 1/2 window height |
| Page Up | Up 1/2 window height |
| Ctrl+Page Down | Right 1/2 window width |
| Ctrl+Page Up | Left 1/2 window width |
| Home | Left side of chart |
| End | Right side of chart |
| Ctrl+Home | Top left of chart |
| Ctrl+End | Bottom right of chart |
In the main window, the shape of the cursor indicates what actions are taking place.
The standard arrow cursor appears when no actions are pending and no items are selected for actions.
The cross cursor appears when one or more items is in a selected state, and therefore subject to certain actions.
When the cursor is a box, some action is pending that will result in placing or moving symbols in the chart. When the mouse is clicked (or Enter is pressed), the pending action will complete if possible.
The gunsight cursor (cross with circle) indicates that Chartist is waiting for an initial point selection in a two step action. This includes drawing or selecting a line, and drawing a selection rectangle. To select the initial point, click the mouse button (or press Enter).
The pencil cursor appears when drawing or selecting a line.
The quad arrow, or size cursor indicates that a rectangle is being stretched or shrunk. This occurs when drawing a selection rectangle or when changing the size of a symbol's bounding rectangle.
The double arrow appears when the cursor is over a sizing handle for the selected symbol. The symbol may be re-sized with a click and drag operation.
The routing cursor appears when the auto-router is calculating the routes of lines.
The hourglass cursor indicates that a possibly lengthy operation is taking place, such as file operations.
In addition to menu bar help, there is menu access help system in Chartist. To get help, pull down the Help menu, and select one of the help topics shown.
A good way to become familiar with Chartist is to follow this example, creating a small organization chart.
| Start | From the
Program Manager, double click the mouse on the Chartist
Icon. |
| Setup | Choose the File
Setup Paper & Printer... command from the menu.
Make certain that the correct printer is selected from
the list. Typefaces that you can use in the chart will be
those supported by the selected printer. |
| Page Boundaries | Notice the
green lines on the main display. You may see both solid
and dashed lines. The solid green lines indicate the
boundaries of pages covered by the chart. The dashed
lines indicate the centerlines of the pages.These page
sizes will agree with the configuration of your printer. |
| Grid Points | Also shown
on the main display are small black dots in a regular
pattern. When the Snap to Grid option is checked,
symbols are always centered on grid points. You can turn
the grid points off with the View Grid command. |
| Zooming | The + and -
keys on the numeric keypad cause the display to zoom in
and out. The current scale factor can be seen in the Tool
Bar just under the menu, in percent of full scale. To
return to 100% scale in one step, select the View
Normal command from the menu. At some reduced scale
the grid points will stop being displayed if they are too
close together. |
| Scrolling | The scroll
bars on the right and bottom edges of the main window let
you move the window over the chart. Clicking the arrows
will move the window by 1/8 of its width or height.
Clicking on the gray bar between the rectangle and an
arrow will move the window by 1/2 of its width or height.
You can also click and drag the rectangles
("thumbs"). When you let go, the window will
move to the new scroll position. |
| Maximize Window | If necessary, click on the Maximize button, which is located at the top right corner of the Chartist window title bar. |
| Set Line Style | This chart
is going to use Auto-Routed lines without arrow heads. By
choosing these settings now, you will make them the
default settings for new lines. Click on the |
| Move To Top Center | Click on the bottom right scroll bar arrow until the dashed green vertical centerline of the page is near the center of the display. |
| Add Symbol | Click on the
Alternatively, you can click on the Rect shape in the symbol palette, and bypass the Choose Shape dialog below. Move the cursor to the column of grid points nearest the green centerline. Them move the cursor about 1.5 inches from the top (notice the ruler along the left side of the window), and click the mouse. You will now see the Select Symbol Shape dialog box. |
| Choose Shape | The
available shapes are listed by name. As you highlight
each shape name in the list, you will see a small sample
of the shape to the right. Highlight the Rect shape and click on the OK button, or press Enter. Congratulations, you have added your first symbol to your first chart! |
| Add Text | The first
symbol is going to contain the boss's name. Click the
mouse inside the new symbol. This selects the symbol for
editing. You will see eight selection handles
superimposed on the symbol. Choose the Symbol Text... command from the menu, or press F3, or double-click inside the symbol. Any of these actions will bring up the Edit Symbol Text dialog box. At the center of the dialog box, you will see a white rectangular area with a flashing text caret. This area is the area inside the symbol into which text can be entered. It will vary in size depending on the size and shape of the symbol you are editing. Type the following into the text area: John Jones [Enter] President [Enter] here means to press the Enter key to start a new line. Notice how the text centers itself in the text area as you type. Click on the OK button, or press Alt+O. |
| Add More Symbols | Similarly,
add a second and third symbol to the chart: Add a Rect below and to the left of the first one. Add the following text to this symbol: Rick Davis VP Design Add a third rectangle below and to the right of the first one. Add the following text to the symbol: Julia Able VP Finance |
| Moving Symbols | If you did not leave enough room between the symbols, you can move a symbol by clicking inside the symbol and holding the mouse button down while you drag the symbol to a new location. When you let go of the button, the symbol will move to the new location. |
| Add Line | Click on the
Click and hold the left mouse button. the cursor will change to a pencil. Still holding down the button, drag the cursor to the bottom left symbol, inside it and near the center of the top side. Release the button, and the line will be drawn. Alternatively, you can use the right mouse button to draw lines. Click and hold the right button down and the starting point, and release at the ending point. Note that a line exits the edge of a symbol nearest the click, and enters the edge of a symbol nearest the release. |
| Deleting Lines | If the line did not route from the bottom of the first symbol to the top of the second, you did not designate the start and end points properly. You can delete the line by selecting it and pressing the Delete key. |
| Selecting Lines | To select a line, place the cursor on the line but outside the connected symbol. Click the left mouse button. When the line is selected, it is drawn in reverse colors. |
| Add Second Line | Similarly, add a second line from the bottom edge of the top symbol to the top edge of the third symbol. Notice that the second line shares part of its path with the first one. |
| Add Title | Add a symbol
near the top of the chart, on the same center line as the
first symbol. Choose the Titl-Cent shape from shape the list. Notice that this shape has no scale model to the right of the shape list. A title shape does not have a border. When the shape appears in the chart, it will be outlined with a dash-dot line. This informs you that this is a borderless shape. The dash-dot line will not show when printed. Place the following text in the Title: Our Team |
| To print the
chart, deselect all items by clicking outside any
symbols and away from any lines, then choose the File
Print... command from the main menu. You will see the
Print dialog box. Click on the OK button to print
the chart. One page will be printed. Chartist automatically prints all of the pages required to cover the information in the chart. |
Note: This example assumes that the default font for your selected printer will allow all of the above text to fit inside the respective symbols. If the default font is too big, start over, and do the following:
When you get ready to add text to the first symbol, click on the Fonts... button in the Edit Text dialog box.. Click on the Size box and edit in a smaller point size for the font. For example, if the current size is 12 points, try 10 points instead. Then click on the OK button in the Fonts dialog to go back to the Edit Text dialog. Once you choose a font in this way, it becomes the default font selection for new symbols. See the section on Selecting Fonts For Symbol Text.